Friday, February 27, 2015

The Dress (Dropper Tool Tutorial)

Color Analyzing

Difficulty: 1/10

What comes to mind when I say Blue and Black or White and Gold? 
If it's not this picture right here, you forgot to pay your internet bill. 
If you are one of the few who have yet to see this picture, let me explain it to you and the two types of people in this world. There are the people who see this dress as blue and black, and there are the people that see this dress as white and gold. Now, I know what you're thinking, "There's no way that dress is X and X, it's X and X!" And that's what I thought too. It looked 100% blue and black to me, but after showing it to some friends they thought it was white and gold. So go ahead, look at this picture, decide what color it is, and show it to a friend.

So how can I make a tutorial out of this? Well I'm going to teach you guys how to analyze the colors of a picture so you can tell what the true colors of a picture really are. Then, we will apply this newly learned skill to the picture of the dress and find the TRUE color.

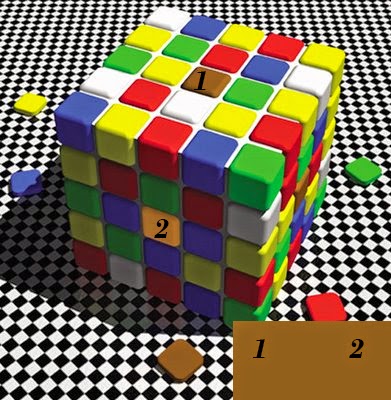
So first what we all will both do is take a sample picture. I'll be using this picture for reasons that will be obvious later.
Open it on Photoshop by clicking File then Open and select the file.
Your screen should now look like this:

Then, add a white rectangle to the bottom right of the picture by selecting the rectangle tool and adding a white filled rectangle. Your picture should now look like this:

(Remember these next couple of steps, we're going to repeat them once more)
Next, get the dropper tool. It's the tool I have selected here.


Then, select the color that you want by clicking on the color you want. I'll be selecting the area labelled one and then when I repeat these steps I'll be selecting the area labelled two.

Next, make another rectangle over half of the white rectangle. By default, since you used the dropper tool, the rectangle will be the color of the selected area (Our number 1).

Now, repeat the past couple of steps up to the point where it said you'd repeat but use the second color you want to use.
(Optional: Add 1 and 2 or lines connecting to the correlating rectangles to show what color is which)
Make another rectangle and put it next to the first one. Your finale image should look like this!

If you were following along (or looked at the picture right above this text) You'll notice that 1 and 2 are actually the same color! Due to the optical illusion of the shadowing they appear to be very different colors but are actually the same, and thanks to analyzing the colors, now we know!

So,  I used all of the steps above one the picture of the dress we talked about in the beginning and got the final image. If you're truly ready to find out the TRUE color of the picture, click here!

This was a very basic level of teaching and if you're looking for something more in depth you can look here or here!

Thank you, and I hope your soul is finally at peace now that you know the true color.


Friday, February 20, 2015

Liquidy Goodness

Liquify Tool

Difficulty: 3/10
Today we're going to look at a brand new tool. Well, a filter actually, but that's not important. This tool is called "Liquify!" Now, before you ask, no, it does not blend pictures to make it look like a liquid. What this tool does is allows you to move and slide around parts of an image as if it were all painted on water and you could move it with your finger. 
Liquify if a very common tool used when editing models for advertisements or magazines. Whether this is ethical or not is up to you as reader. If you want to look more into the ethics of Photoshopping models you can look here! To make sure that I don't step into the world of ethics I'm going to do the complete opposite. I'll be taking a natural picture of my attractive friend and be turning it ugly.

For this tutorial here is my canvas! Open any photo you want to edit on Photoshop. If it happens to also be a picture of my friend, this tutorial will be even EASIER to follow.

What we want to do to start this liquid process is to go to filter and then click "Liquify..."

A big window will open up with a load full of options. This is just a beginner tutorial so we won't go too in depth, just the main use of the Liquify tool. Your screen should now look like this:

Now, here comes the most complicated step of the process, and it's super easy; adjusting your brush width. Simply drag the bar on the right titled "Brush Size" left or right, depending on what size you want it. Once you do that here comes the fun! Put your mouse and click and drag on the picture. Here is what it should look life if you do a simple straight line through the picture:

Now, what I'm going to do (and I suggest you do too) is just stretch parts of his facial features to make him look uglier. I'm going to push down the eyebrows, frown the lips, and mess with his nose. Once I did all of this I'm left with something like this:

The best way to perfect the liquify tool is trial and error. Keep repeating until you get your desired look. This is obviously a goofy method and not to be used for more serious editing. If you're looking for a more serious or in depth method of using the liquify tool, Adobe gives a great tutorial right here!
(Also, if you happen to see this guy make sure to tell him thanks for being such a great model, his name is Jay!)
If you have any questions or suggestions please comment below!


Friday, February 13, 2015

Content-Aware Fill Tool Tutorial

Content-Aware Fill Tool Tutorial

Difficulty: 3/10

Oh God, not again. You had the perfect picture set up. A pristine table, waiting for a picture to be taken of it, when out of no where a Dr.Pepper bottle pops up and ruins the whole picture! What do you do? Take another picture? I mean, if you want to go the lame way, go ahead. But the easy and fun way is to Photoshop it out.
The content-aware fill tool can be one of the most useful tools in Photoshop. It is used to remove objects from a picture leaving a background based off the content around it. It’s extremely simple but does not always work with 100% success or exactly how you want it. Here’s how we do it.
 First, start with the image you want to edit. For this demonstration I’ll be removing this Dr.Pepper, it’s extremely distracting the viewers from this fine table.
 Select the Polygonal Lasso tool and enclose the bottle like so:
 Next, push shift + F5 to open the Fill window. Set Use to Content-Aware and leave the rest of the settings at default.
 Push OK and you should be left with this:
 Notice you still have a little bit of shadow left. You have two options. You can use the paintbrush tool to just paint over it, or you can attempt to use the Content-Aware fill tool again. We’ll be doing the second option. Again, use the Polygonal Lasso tool to select the shadow area like so:
 Push Shift F5 again and push OK and you should be left with your final image, the sodaless table!
And there we go! It's just as if there was never a Dr.Pepper in the first place. So next time you're going to be lame and retake the picture just remember, don't retake the picture, just Photoshop it out! 
If you're having some issues you can check out this blog and see if it soles any problems.
Now remember, Photoshop won't magically fix all pictures like above, a lot of people have problems with it, like this user here: Error!

If you would like to make a formal complaint to Dr.Pepper for their soda bottle's habit of ruining pictures, feel free to do so here: Complain!
Please comment with any problems or questions. Thank you!